Display Shots with the Dribbble v2 API
Here’s how to register a v2 API Dribbble application, generate your client access token and display your shots on a webpage using Javascript.
Compared to v1, the new Dribbble API (v2) changes the way you authenticate applications needing read-only access to Dribbble shots.
Register a Dribbble application
You need to register an application with Dribbble to be able access content via the API, this process hasn’t changed with the update to v2…
- Login to your dribbble.com account page
- Select Applications from the side menu
- in the Developers section, select Register a New Application
- Fill in the form, use your website URL in the Callback URL field (you will need that later)
- Read the Terms, and Register
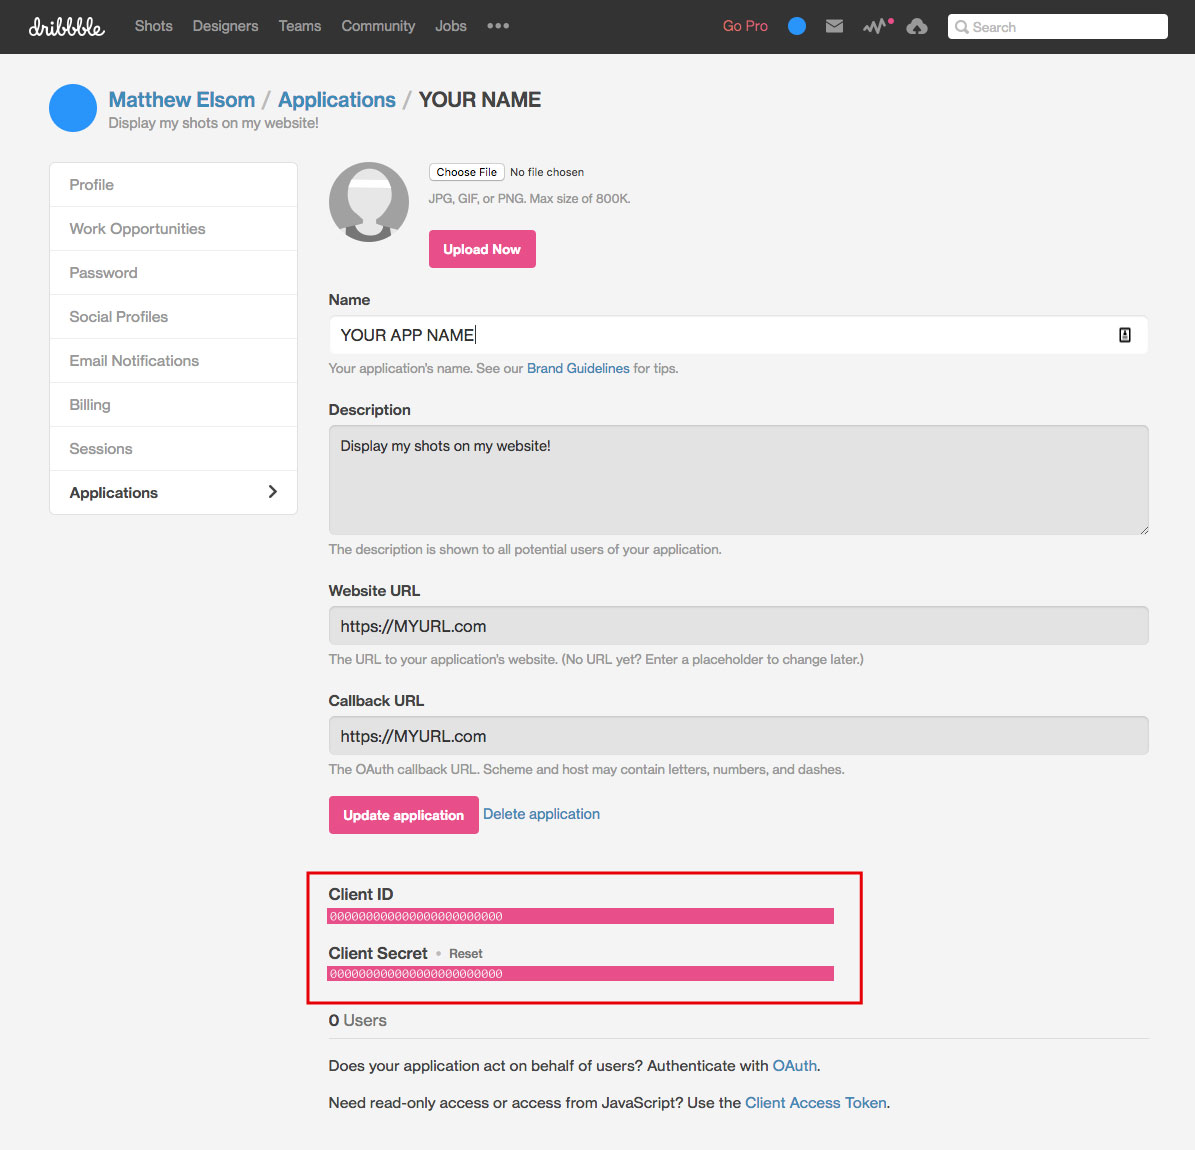
You will be redirected to a screen that shows your successfully registered app details, note the Client ID and Client Secret numbers at the bottom of the page.
Generate an Access Token
In v1 of the API, you were provided with your access token when registering your app, with v2 we need to do a little extra work to generate the token.
Authorizing
- Open a browser window and log into your Dribbble account
- In a new window, go to the following url:
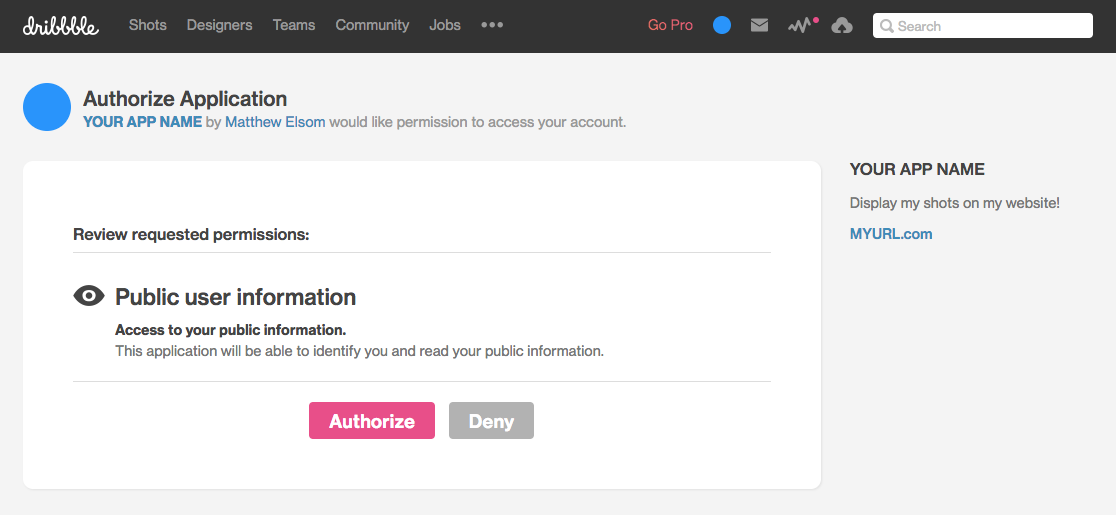
https://dribbble.com/oauth/authorize?client_id=CLIENT_ID(Replace CLIENT_ID with the long Client ID number provided when you registered your application) - A Authorization Screen will appear with the name of the application you registered, choose to Authorize your application
After authorizing, you will be redirected to a URL that looks similar to this:
http://callback_url?code=9892aebffbb8c82d93e3f2c63a1dab160cefcb1ae269df3a4315924b87246a67Get the token
- Using Postman, create a new Request
- Select POST, and enter the following URL:
https://dribbble.com/oauth/token?client_id=CLIENT_ID&client_secret=CLIENT_SECRET&code=COPIED_CODE - Replace the CLIENT_ID and CLIENT_SECRET with the ID and Secret provided by Dribbble after successfully registering your app
- Replace the COPIED_CODE with the code you just copied from the callback URL page
- Hit Send, and your Access Token will be returned, mine looked like this:
{
    "access_token": "9f061d26c5a8be96b17a81718959a67dd54ca9669ca41752777193f7cc5be7c3",
    "token_type": "bearer",
    "scope": "public",
    "created_at": 1520591461
}
Using the API in a webpage
Now you have the Access Token, you can write a script to display your shots in a webpage!
First, some HTML that we will prepend with your shots…
<div id="shots"></div>Now for the script that calls the API… You can use the same script as below, replacing the accessToken variable with your generated Access Token. This script will wrap each of your shots in a link back to Dribbble, and add the shot title.
// Set the Access Token
var accessToken = '9f061d26c5a8be96b17a81718959a67dd54ca9669ca41752777193f7cc5be7c3';

// Call Dribble v2 API
$.ajax({
    url: 'https://api.dribbble.com/v2/user/shots?access_token='+accessToken,
    dataType: 'json',
    type: 'GET',
    success: function(data) {
      if (data.length > 0) {
        $.each(data.reverse(), function(i, val) {
          $('#shots').prepend(
            '<a class="shot" target="_blank" href="'+ val.html_url +'" title="' + val.title + '"><div class="title">' + val.title + '</div><img src="'+ val.images.hidpi +'"/></a>'
            )
        })
      }
      else {
        $('#shots').append('<p>No shots yet!</p>');
      }
    }
});
If you want to change the template, you can use some of these API variables. The hidpi image size is the only one that will show you animated shots. Check the Dribbble API Documentation for more options.
//Image width 800x600 (Animated)
val.images.hidpi
//Image width 400x300
val.images.normal
//Image width 200x150
val.images.teaser
//Title
val.title
//Description
val.description
//URL
val.html_url
Lastly, you can add a little CSS to style your shots. Here is my SCSS.
@import url('https://fonts.googleapis.com/css?family=Rubik');

$pink: #ea4c89;


html,
body {
  padding: 0;
  margin: 0;
  background: whitesmoke;
  font-family: "Rubik";
  font-size: 15px;
}

#shots {
  display: flex;
  flex-wrap: wrap;
  max-width: 1080px;
  margin: auto;

  .shot {
    position: relative;
    display: block;
    width: 25%;
    background: $pink;
    color: white;
    text-decoration: none;

    &:hover {
      img {
        opacity: .1;
      }
      .title {
        opacity: 1;
      }
    }

    .title {
      position: absolute;
      width: calc(100% - 2rem);
      padding: 1rem;
      opacity: 0;
      transition: opacity .2s ease-in-out;
      font-size: 1rem;
      font-weight: 500;
      letter-spacing: 1px;
    }

    img {
      display: block;
      max-width: 100%;
      transition: opacity .2s ease-in-out;
    }
  }
}
Demo
See the Pen Dribbble Shots via v2 API by Matthew Elsom (@matthewelsom) on CodePen.